¶ XignIn JavaScript Login Library
¶ Authentication Flow
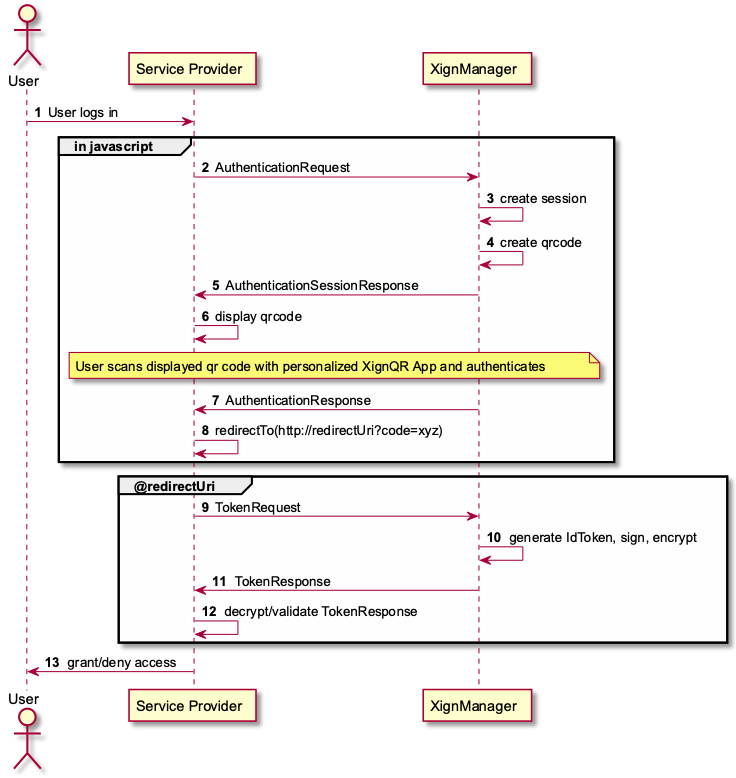
¶ User-Agent implementation
To use the XignIn Authentication, a QR-Code must be shown to the user. This can be done by integrating a Javascript snippet into the frontend of your application.
The Javascript can be fetched via the following URL:
https://<XignIn-Manager-URL>/js/xignqr-jslogin.umd.min.js
To configure the javascript snippet you need some information about the configured service you want to use for the login from the XignIn-Manager. So please follow the services documentation to create one. After you have successfully created a service in the XignIn-Manager, then please download the config file from this service. The resulting file is a ZIP file which contains a configuration JSON (or you can use the Configuration Guide for the JS-Login, to get the necessary data).
For the configuration of the Javascript we need some information of the JSON file (or the configuration guide).
| value | example |
|---|---|
| clientId | e55a581a-1234-5678-a8e0-abcdefghijkl |
| XignIn-Manager-URL | https://xign.me |
| redirectUri | https://my-company.com/redirect |
To include the Javascript in the HTML frontend, use the following snippet:
¶ Code Example for Browser
To integrate XignIn, there are two steps the integrator has to follow. First the following code snippet has to be integrated into the page, which is responsible for showing the QR code to the user and to control the user agent.
<script type="text/javascript" src="https://<XignIn-Manager-URL>/js/xignqr-jslogin.umd.min.js"></script>

<script type="text/javascript">

    document.addEventListener("DOMContentLoaded", function () {
      	const auth = function (authorizationCode) {
        		// handle sucessfull authentication
        };
        const config = {
            managerUri: "https://<XignIn-Manager-URL>",
            containerId: "login", // the id of the container element in the html page, that is mentioned below.
            clientId: "<clientId>",
            mode: XignQRLogin.XignLoginMode.PULL_TOKEN,
            redirectUri: "<redirectUri>",
            useSSO: false,
          	onAuthentication: auth // you can provide a javascript callback function, or if not, the redirect uri will be called.
        };

        const login = new XignQRLogin.XignQRLogin(config);
        login.start();
    });
</script>

<body>
    <div class="container">
        <div id="login"></div>
        <!--
            The xignsys-jslogin container element.
            The id attribute is used to be passed to the XignQRLogin configuration.
            The QR-Code will be shown inside this element.
        -->
    </div>
</body>
In this snippet we have defined two things:
- an auth function, which will be called if the authentication was successful (optional)
- if you don’t provide this function, then you can remove the onAuthentication option in the config and the redirectUri will be called instead.
- a config, which provides the configuration for the XignIn-Authentication.
- Here you need to fulfill all the values you got from the JSON file.
The div container with the id=”login” will hold the QR-Code later on.
¶ Service provider implementation
On the Server side the following implementation is necessary:
- Show the frontend QR-Code to the user
- Get the AuthorizationCode as response from the successfull authentication in the server. (via redirectUri, then the code is added as parameter in the URL; via onAuthentication function, then the code is a parameter of the function)
- Use the
AuthorizationCodeand thetokenUrlto retrieve the id_token from the XignIn-Manager.
¶ 1. Show the frontend QR-Code to the user
First of all, show the frontend to the user and display the QR-Code.
¶ 2. Get the AuthenticationCode
If the authentication is done, then the frontend onAuthentication function or the redirectUri is called. If you have implemented the OnAuthentication function, then you can send the Code to your server by calling a self-defined route.
¶ 3. Use the AuthenticationCode and retrieve the id_token
After the authentication is done, the user’s user-agent is redirected to the registered redirect URI (or via onAuthentication javascript function), along with an authorization code. At the redirect URI the service provider uses the authorization code to retrieve information about the authenticated user. The token endpoint is in fact a OpenID Connect Token Endpoint, that supports encryption compliant to the OpenID Connect Specification:
Encryption:
- RSA OAEP (Encryption of a Content Encryption Key with the RSA Public Key of the service provider), the algorithm used is A256CBC-HS512 (Advanced Encryption Standard (AES) in Cipher Block Chaining (CBC) mode with PKCS #5 padding (NIST.800-38A) with an integrity calculation using HMAC SHA-512, using a 512 bit CMK and a 256 bit CEK (see RFC7516)
- ECDH-ES (Key Agreement based on Elliptic Curve Keys; the resulting key is used to encrypt the CEK) the algorithm used is also A256CBC-HS512 (Advanced Encryption Standard (AES) in Cipher Block Chaining (CBC) mode with PKCS #5 padding (NIST.800-38A) with an integrity calculation using HMAC SHA-512, using a 512 bit CMK and a 256 bit CEK (see RFC7518)
Signatures:
- RS256 RSASSA-PKCS-v1_5 with SHA-256 Hash Algorithm (see RFC7515)
- ES256 ECDSA with curve P-256 (secpr-256) and SHA-256 Hash algorithm (see RFC7515)
The token requests resembles the token requests defined in section 3.1.3.1. Token Request of the OpenID Connect specification. In response to the token request, the server issues an OpenID Connect ID Token Response containing the ID Token and ultimately the user information.
¶ Code example for service provider to retrieve authenticated user information
TokenUrlavailable at:https://<XignIn-Manager-URL>/api/rp/token
Example-Code (Java code which uses com.nimbusds oauth2-oidc-sdk):
ClientID clientId = new ClientID("<clientId>");
Secret secret = new Secret("<clientSecret>");
ClientSecretBasic cSecretBasic = new ClientSecretBasic(clientId, secret);
AuthorizationCode authCode = new AuthorizationCode("<authorizationCode>");

AuthorizationCodeGrant grant;
try {
    grant = new AuthorizationCodeGrant(authCode, new URI("<redirectUri>"));
} catch (URISyntaxException ex) {
    // handle error
}

TokenRequest tokenRequest;
try {
    tokenRequest = new TokenRequest(new URI("<tokenUrl>"), cSecretBasic, grant);
} catch (URISyntaxException ex) {
    // handle error
}
In the code there are some placeholder for the following attributes:
| placeholder | description |
|---|---|
| Client ID | the clientId which you can find in the JSON file. |
| Client Secret | The clientSecret for the client. Can be found in the JSON file. |
| Authorization Code | the code which you will get after a successful authentication via the redirectUri or the onAuthentication method in the frontend and which will be send to server to use it here. |
| redirectUri | the redirectUri from the JSON file. |
| tokenUrl | the tokenUrl. |
As a ClientAuthentication at the Token-Endpoint the following methods are supported:
- client_secret_basic
- client_secret_post
More information about ClientAuthentication can be found in the OpenId Connect Specification 9. ClientAuthentication
If everything is provided, the request can be sent to the XignIn-Manager:
HTTPResponse httpResponse;
try {
    HTTPRequest req = tokenRequest.toHTTPRequest();
    req.ensureMethod(HTTPRequest.Method.POST);
    httpResponse = req.send();
} catch (IOException | ParseException ex) {
    // handle exception
}

TokenResponse tokenResponse;
try {
    tokenResponse = OIDCTokenResponseParser.parse(httpResponse);
} catch (ParseException ex) {
    // handle exception
}
OIDCTokenResponse oidcTokenResponse = (OIDCTokenResponse)tokenResponse.toSuccessResponse();
The response is of type OIDCTokenResponse which can now be used to extract the id_token information with the user data.
Depending on the client settings in the XignIn-Manager, the id_token can be encrypted and signed or only signed.
In case the id_token is encrypted the following steps must be performed:
- get the information about the used algorithm via the header
- this could be ECDH-ES or RSA-OAEP
- decrypt the id_token with the correct keys.
- the keys can be found in the JSON file as keystore/alias/password or use the other files from the zip file (downloaded before).
After that, you need to check the signature of the id_token, this can be done also via different signature validation algorithm. The signature algorithm is related to the encryption algorithm:
- ES256
- RS256
¶ Decrypt id_token
If the tokenResponse is encrypted then you have decrypt it first, before you can check the signature. This step can be skipped if the token is only signed.
Example-Code (example with ECDH-ES):
// [1]
((JWEHeader)oidcTokenResponse.getOIDCTokens().getIDToken().getHeader()).getAlgorithm();

// [2]
ECDHDecrypter decrypter = null;
decrypter = new ECDHDecrypter(
        (ECPrivateKey) keyStore.getKey("alias", "password")
    );

// [3]
JWEObject jweObject = JWEObject.parse(oidcTokenResponse.toJsonObject().getAsString("id_token"));

// [4]
byte[] dec = decrypter.decrypt(
        jweObject.getHeader(),
        null,
        jweObject.getIV(),
        jweObject.getCipherText(),
        jweObject.getAuthTag()
);

// [5]
JWSObject jwsObject = JWSObject.parse(new String(dec));
The first line [1] describes how to get the JWE Header and how to find out the Algorithm.
In this example the ECDH Algorithm is used for the decryption.
[2] For the decryption there are some information necessary:
- The keystore alias (from the JSON file)
- The keystore password (from the JSON file)
- The keystore (from the JSON file)
[3] In line three the JWE Object will be retrieved and used together with the decrypter to decrypt it [4].
The decrypted JWE can be parsed into a JWSObject [5] which can then be used to check the signature of the id_token.
¶ Verify id_token signature
To verify the signature of the id_token, it can be either decrypted before or parsed directly from the tokenResponse. To decide if the toneResponse is encrypted or not, you can check the Header. If the Header is a JWE-Header, then it is encrypted otherwise not.
Example Code:
oidcTokenResponse.getOIDCTokens().getIDToken().getHeader() instanceof JWEHeader
There are two possible signature validation algorithms, which can be find out via the Header Algorithm attribute. Possible values are ES256 and RS256. Depending on the Algorithm another Signature Validation Object should be created. Before you can validate the signature, you have to request the public keys from the XignIn-Manager for the signature validation.
This can be done via the following URL:
JWKS Url
https://XignIn-Manager-URL/openid/jwks
Example-Code (Example with EC => ES256):
//[1]
JWKSet metaData; // Retrieved via the URL

//[2]
Optional<JWK> jwk = metaData.getKeys() // retrieve the Key you need (EC or RSA)

ECKey ecJWK = (ECKey) optionalJWK.get();
PublicKey ecPublicKey = ecJWK.toECPublicKey();

//[3]
ECDSAVerifier verifier = new ECDSAVerifier((ECPublicKey) ecPublicKey);
[1] Retrieve the JWK MetaData from the XignIn-Manager. The JWK contains the Public Keys for the EC and RSA algorithm to verify the signature.
[2] Get the correct Key you want to use. EC or RSA, depending on the tokenResponse Header information.
[3] Create a verifier (here for EC). If a verifier was created, then use it to validate the signature of the id_token.
Example-Code (Example with EC => ES256):
// in case the tokenResponse is NOT encrypted.
JWSObject jwsObject = JWSObject.parse(oidcTokenResponse.toJsonObject().getAsString("id_token"));

// otherwise, the tokenResponse was decrypted and then parsed
JWSObject jwsObject = JWSObject.parse(new String(decryptedJWE)); // see above

boolean verified = verifier.verify(jwsObject.getHeader(), jwsObject.getSigningInput(), jwsObject.getSignature());
After the verification was successful, you can obtain the JWT-Claims which was send from the XignIn-Manager in payload of the id_token.
Example-Code:
JSONObject responseObject = jwsObject.getPayload().toJSONObject();

JWTClaimsSet claimsSet = JWTClaimsSet.parse(responseObject);
String mappingId = claimsSet.getSubject();
The JWT-Claims contains several attributes which can be used and stored in the server. Keep in mind, that you only get this information which were setup in the XignIn-Manager Client settings (and the user in the XignIn-Manager has set all these values). Important is the following attribute:
- sub (the subject)
The subject is the important part of the claims, because it describes the unique mappingId of the user in the XignIn-Manager. This id should be stored together with a user in your system, so that you can find it with this id. If there is no user with this Id in your system, you must decide how to map it to any user in your system. Maybe you can use some other claims (like email) to get more information about the currently authenticated user.
¶ Endpoints used from the XignIn JavaScript-Login lib
¶ Authentication via QR code
The XignManager provides two separate endpoints to retrieve the qr code and the authentication result. The communication with these endpoints is abstracted into a JavaScript library. The endpoint for the QR code is available at:
Request QR-Code
https://<XignIn-Manager-URL>/api/rp/qrcode
After the QR Code is retrieved and displayed, the user performs the authentication. The authentication result can be retrieved from:
Retrieve authentication status response
https://<XignIn-Manager-URL>/api/rp/authentication-response
¶ Authentication via push notification
This feature is under construction
The service provider is able to trigger an authentication process via push-notifications, that are sent to the user’s smartphone. The push-notification is sent, when the service provider sends an appropriate message to the push authentication endpoint available at:
https://<XignIn-Manager-URL>/api/rp/push
The result of the push notification is retrieved from the push result endpoint at:
https://<XignIn-Manager-URL>/api/rp/push-result
The Authentication via push notifications resembles that of the authentication via QR code. The main difference between the triggers, is the way the information about the authentication process is conveyed to the smartphone.